
This article by Brendalynn Ens was originally published in the SHS March 2020 newsletter. Brendalynn is a Master Gardener and member of the SHS Water Gardening Sub-Committee.
Last year, a newer trend in hobby hydroponic gardening really expanded. AeroGrow International Inc. (the company who manufactures and distributes the AeroGarden™ gardening system kits) reported 224% increase in sales for its last two consecutive financial quarters. This increased interest may be due in part to so many of us at home more during the pandemic. For some of us, it’s a way to continue our water-gardening passion and also an easy mechanism to grow our own salad greens, tomatoes and herbs in the dead of winter!
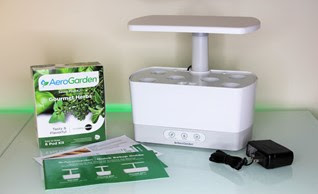
AeroGarden™ is a self-contained, in-home “kit” for hydroponic seed growing. In essence, it's a water and liquid fertilizer mini hydroponic system with its own grow-light system. The kits are available nearly everywhere and range in price from $120-$250 CDN depending on the size or sale. Pre-sown pods can be purchased along with general supplies to grown your own seeds. The system runs on an small internal pump. How much does it cost to run?
The standard 6-pod “kit” looks like this (see Figure 1). Smaller and larger pod kits are also available.
I started my first kit in early fall and quickly got caught up in harvesting fresh herbs and lettuce. By December 2020 I had purchased a 2nd unit and now they are both still in full operation. Despite the simplicity I appreciate the science and instructions that allow this kit to deliver fresh produce. I joined a Facebook AeroGarden Community group with nearly 20,000 users and found it to be a very valuable forum to trouble-shoot issues and receive support. Many Facebook group members have 5+ units going year-round and have done so for years (Canada, USA, Australia, New Zealand) so in comparison I am very much a neophyte and only beginning my journey.
In case you are thinking about getting an AeroGarden or already on your way, I’ve compiled my Top 6 list of things that may be helpful. Remember, I am no expert here, but I’m learning fast and it’s a great cold-weather distraction.
Top 6 Learnings – AeroGarden™
1. Really read and follow all instructions. The instructions are incredibly easy but don’t skip reading them carefully. Pay particular attention to the precise measurement of liquid fertilizer (4-3-6) and keep ongoing notes to avoid missing top-up fertilizing over time. Too much fertilizer can result in a hyper-rich nutrient environment and balance that quickly results in algae growth and mucky water. This hasn’t happened to me (so far!) but I’ve heard of others experiencing a green algae bloom mess in their system that required extensive cleaning and a full restart.
2. Check water levels weekly and don’t rely on automatic notifications. Certain plants you may be growing (i.e. lettuce) can result in much more water being used more quickly than what the system automatically advises. Keep an eye on the clarity of the water also – if its getting murky, consider changing it.
3. The type of water makes a difference. While the kit’s instructions recommend a 50/50 mix of distilled and tap water, I use Saskatoon tap water with no issues. Online experts confirm that hard high-mineral and well water is never recommended and can result in calcium build-up in the internal pump system.
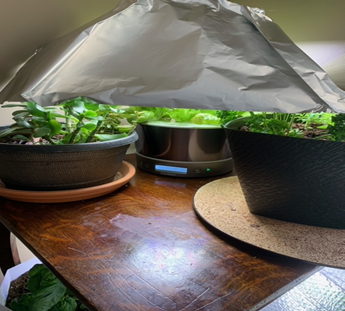
4. Synchronize the light timer to be off at night. Unless you want your AeroGarden fully illuminating your entire kitchen or living room in the dead of night, it is best to set your AeroGarden system to be on with daylight hours. Most kit lights are programmed to provide 10-12+ hours of growing support to plants. To avoid having your AeroGarden become a “night-light” in your house, find a suitably sized lampshade or create a folded tinfoil “tent” to reflect the light back onto the plants when it is on. Figure 2 shows my set-up that benefits other plants nearby as well.
5. Use or prune your plants AND their root growth. The excitement of seeing your vegetables emerge from the pods and mature can be thrilling but similar to how lettuce can ‘bolt’ in the summer heat, the same can happen with this system. Overgrown plants may create unnecessary shade for other plants due to their proximity in the grow system. Don’t let lanky and unattended plant leaves and stems endlessly grow. This can happen fast! Pruning and/or use of your herbs and vegetables is no different than in our regular summer gardens. Here’s a video that may help hydroponic plant pruning. Don’t forget the root system also! Healthy and rapidly growing plants will have highly developed root systems with risk to get caught in the internal pump system. Figure 3 is a Thyme plant which I cut 1” off the bottom to ensure the roots don’t interfere with the circulation of the water pump system. Here is more guidance on how to do that. Another option, of course, is to transplant your healthy hydroponic plants to other containers allowing you to start new ones!

6. Yes you can transplant the plants into other vessels or devices. Many experts advocate for using the Kratky method to keep plants long-term. The Kratky method is a next-step hydroponic method that does not involve running or circulating water. If Kratky isn’t your thing, the pods can be also successfully transplanted to soil or soil-less medium.
In conclusion, I’ve found the AeroGarden™ system to be an easy and successful new trend. It’s not quite the same as summer water gardening but it has been a welcome distraction from the cold winter days and the stay-at-home orders.


No comments:
Post a Comment