Saturday, March 18, 2023

2023 Spring Workshops!

Did you know that your SHS membership not only gets you excellent discounts to our business partners, but also free enrolment in gardening workshops? This spring we have two exciting workshops planned for our members! As always, non-members can also sign up for $10. Email info@saskatoonhortsociety.ca to sign up for either (or both!) workshop. There will also be a signup sheet at our Gardenscape booth (March 24-26, Prairieland Park.)

The first workshop will be held on March 29, at 7:00pm over Zoom. Join the owners of Bergamot & Basil Specialty Herbs to learn all about starting your garden from scratch using seeds and cuttings. Note that this is a different workshop from what Bergamot & Basil presented last year. Just in time to start your tomato seedlings! More information can be found in the promotional graphics below.


The second workshop will be held in-person at Sherbrooke Community Centre during the morning of May 13. Learn how to prune your shrubs and fruit trees with confidence from Robin Adair, ISA Certified Arborist. This workshop includes both classroom and hands-on practical components.


We hope to see you at one or both workshops! Spring is here!


Monday, September 12, 2022

Use Up That Giant Zucchini

Whether it grew out of control while you were away for the long weekend or a coworker sneakily left one on your desk and won't own up to it, you're probably stuck with a giant zucchini or two right now! If you're over the zucchini and chocolate muffin combo, here are some other delicious ideas for using up a lot of zucchini. I have stuck mainly with ideas that use grated zucchini as this is a great way to use a lot at once since it cooks down so quickly.

1. Sweet baked goods that aren't double chocolate zucchini muffins

While it seems our go-to is always chocolate and zucchini, there are infinite recipes online for using zucchini in baked goods without chocolate. Zucchini-carrot cake, zucchini lemon scones, zucchini banana bread - if you think sounds good, Google it and you'll probably find a recipe!

2. Zucchini pancakes/fritters

I personally LOVE this recipe for Chinese Zucchini Pancakes, but there are hundreds of other recipes out there that mix zucchini with other vegetables such as potatoes.

3. Zucchini butter

Zucchini butter involves cooking down shredded zucchini in butter or olive oil until it's got a spreadable consistency. Then you can use it as a delicious spread or dip (try in a grilled cheese), in an omelet, as a pizza/flatbread topping, or even as a pasta sauce.

4. Zucchini frittata or zucchini slice

What is easier than mixing some grated zucchini and cheese with eggs and throwing it in the oven? If you want to get a little fancier (but just barely), the zucchini dish I've been most obsessed with this summer is Australian zucchini slice - recipe at the end of this post!

5. Zucchini casserole

Grated, sliced, cubed, with cheese or without, straight zucchini or mixed with other vegetables, there are endless options for zucchini casserole. Make a big batch for lunches all week!

6. Freeze it for later

If you just don't have time to make all the things right now, use the squeezing method described in the recipe below to remove excess water, and then freeze grated zucchini to use during the winter months.


Zucchini Slice Recipe

This is a popular Australian recipe that I just discovered this summer and I can't get enough! It makes amazing leftovers and is perfect for a packed lunch or quick breakfast. I initially got the recipe from Budget Bytes but have adapted it for my own preferences.

Makes 8 servings

Preheat oven to 375

Ingredients:

  • Approximately 2 cups grated zucchini
  • 1/2 cup green onion, chopped small
  • 1/4 cup green pepper, sliced thin (optional)
  • 5 large eggs
  • 1 cup shredded cheddar (or other sharp cheese)
  • 1 cup flour (white or whole wheat is fine)
  • 2 tsp baking powder
  • 1/4 cup olive oil
  • 150g ham, sliced or cubed (about 1 cup)
  • 1 tsp pepper
  • 2 tsp salt

Put the zucchini in a colander, add the salt, mix in with your fingers, and set over a bowl or sink to drain for 10 minutes.

Mix the onion, green pepper, eggs, cheese, ham, and oil.

Mix the dry ingredients.

Squeeze the liquid out of the zucchini. There are a few options for this - you can put it into a tea towel or cheesecloth and wring it out, just squeeze handfuls of zucchini with your bare hands, or use a potato ricer. Do not rinse the zucchini before (or after) to remove salt - any excess salt will drain off, and you want to keep some salt for flavour.

Mix the zucchini in with the wet ingredients and then add the dry ingredients.

Spread batter into a 9x13 pan, either greased or lined with parchment. Bake for 30-40 minutes until it is firm to the touch. Allow to cool and slice into 8 pieces. Can be served at any temperature.


Monday, August 15, 2022

Hope to see you at the SHS End of Summer Garage Sale!

It’s hard to believe that we’ve hit the midway point of August already! It’s time for harvesting and preserving and enjoying all the fruits of our summer labour. It’s also time for the Saskatoon Horticultural Society’s End of Summer Garage Sale!

Have you been starting some fall cleaning already, or are you looking for some new-to-you treasures to freshen up your home for the cooler months? Whether you’d like to donate items, purchase items, or just volunteer some of your time, there’s something for everyone at this event.


Donations will be accepted from Monday August 15-Friday August 19, and can be dropped off at 571 Adilman Drive. Please call Marj at 306-880-9340 before showing up to arrange a dropoff time. We accept a wide variety of items (not just gardening equipment) but cannot accept large items such as furniture or entertainment units. Check with Marj or an SHS board member if you are unsure if your items are appropriate to donate.


The sale will take place on Saturday August 20 from 9am-2pm at 571 Adilman Drive. If you would like to volunteer, once again please contact Marj at the number above.


All proceeds from the sale will go towards SHS initiatives such as our scholarships and events.


Come on out and have one last hurrah with the SHS this season! Thank you to everyone who has participated as we restarted our in-person events this spring and summer.


Tuesday, July 12, 2022

The Passport Garden Tour is BACK!!!

It's time to get excited because for the first time since 2019, the Saskatoon Horticultural Society's in-person Passport Garden Tour is happening! We cannot wait to see you at our feature gardens on July 23!

(Photo from previous year's tour)

First, the general details:

Date: July 23, 2022

Time: 12-4 pm

Cost: $15

Where: It's a secret! Buy a passport at Early's Farm and Garden (either location) to find out the six addresses, located in Fairhaven, Nutana, Nutana Park, River Heights, East College Park, and Evergreen. All gardens are located in Saskatoon, with a bonus rural garden open in the morning only

Other Details: This is a self-drive (or walk/bike/scooter/etc.) tour, and you can visit as many of the yards as you like within the opening hours, in whatever order works best for you. Homeowners and SHS volunteers will be present to answer questions and chat all things gardening. (On that note, want to volunteer? Contact us.)

Whatever your favourite gardening style, the tour locations have something for everyone! You will see:

  • a 22-year old 45-foot wide espaliered Norland apple tree
  • Jurassic-sized sun-loving hostas
  • gorgeous water features including aquatic plants and goldfish
  • 10-year old Arctic kiwi vines
  • architectural accents and custom decor
  • a boulevard garden
  • veggies and fruit thriving in minimal sunlight
  • sustainable approaches for water conservation, weed control, and use of small spaces
  • drought-resistant groundcovers
  • fruit trees and shrubs including goji berries, apples, blueberries, sour cherries, pears, saskatoons, raspberries, haskaps, and pincherries
  • perennial beds
  • a large herb garden featuring medicinal and culinary herbs
  • ...and more!
Whether you visit just one yard or all, you're sure to be inspired by the incredible gardens in our community.


(Photo from previous year's tour)

If you can't make the tour, we encourage you to check out our YouTube Channel and watch the videos from our 2020 and 2021 virtual garden tours.

Important Note: The Nest Secret Garden Tour (not affiliated with the SHS Passport Garden Tour) is happening the next day on July 24 and passports are also on sale at Early's. While we encourage you to make a weekend out of it and attend both tours if you can, be sure to purchase the passport for the correct tour if you can only attend one! To attend the SHS tour you will buy a passport for the event on July 23 which costs $15.

Wednesday, April 20, 2022

Upcoming workshop: Take your herb garden to the next level!

Hello SHS members and friends,

We are really excited to be giving a workshop with the SHS on April 28 at 7PM (on Zoom) and wanted to provide some details to hopefully entice you to attend!

At Bergamot & Basil Specialty Herbs our mission is to have a large selection of quality herb bedding plants for you to take back to your garden, patio or deck and start exploring in a new way.  We want to be your herb plant supplier and get you excited about what you are growing and making at home.

Our focus on flavour and function strives to inspire gardeners to try both classic and new-to-you herbs to expand your reach in the garden and the kitchen. We are passionate about exploring international cuisines as well as improving habitats for beneficial insects.

Our workshop is called Take Your Herb Garden to the Next Level! This will not be a “how-to-grow” workshop (though we will throw in our favourite tips and be happy to answer your growing questions) but rather an interactive discussion about some of our favourite plants we’ve come across the past few years that we want you to know about! We want to introduce you to the wide array of herbs available beyond parsley, sage, rosemary, and thyme and get you excited to grow some new-to-you plants that will up your game in the kitchen and/or promote more biodiversity in your garden.

We encourage you to check out the plant listing on our website to get an idea of the herbs we’ll be discussing. The workshop is free for SHS members or $10 for non-members, but remember that memberships are only $15 and quickly pay for themselves in discounts at local garden centres. To sign up, email info@saskatoonhortsociety.ca.

We look forward to meeting you on April 28!

-Robyn & Kaila, Bergamot & Basil Specialty Herbs

PS: We’ll also be selling our plants at the SHS Spring Plant and Water Gardening Fundraiser on May 14!


Monday, March 21, 2022

Make Your SHS Membership Pay for Itself!

If you've considered joining the SHS but want to know more about what's in it for you, you've come to the right place! For the majority of members, the $15 annual membership pays for itself and then some via discounts from our community business partners. 

The majority of business partners offer discounts that are approximately equal to 10% off your purchase, so if you typically spend $150 or more on garden supplies at the participating businesses in a year, your membership easily pays for itself. The membership also provides access to gardening workshops and volunteer opportunities that get you into events like Gardenscape for free. 

In 2022, our business partners and their associated discounts are as follows:

Arbour Crest Tree Services10% discount on removal or pruning of trees and shrubs

Bergamot & Basil Specialty Herbs - Free basil with purchase of any nine plants (in person only)

The Berry Barn$5 off purchase of $50 or more (before taxes). Plants only, no merchandise

Clement Farms Greenhouse and Garden Centre$5 off purchase of $50 or more on regular priced horticultural products (before tax)

Common Ground Regenerative Gardens10% discount on standard labour rates

Dieter Martin Greenhouse - $5 off purchase of $40 or more on regular priced merchandise.  Gift cards and sales items excluded

Early's Farm & Garden Centre10% off regular priced material and gardening products.  Not on any specials or gift cards

Farm One Forty$5 off any purchase over $50

Floral Acres10% off plants and gardening materials. Regular priced merchandise only. Gift cards excluded

Lakeshore Garden Centre10% off on regular priced plants only. Non-transferable

Solar Gardens at Avalon$5 off every $50 purchase on plants only. Other products, gift certificates and specials not included

Sutherland Garden Market - 10% on regular priced plant material and gardening products. Not on any specials

Wayne Bryk Landscaping10% discount and 5% discount on guaranteed referrals

Wild Birds Unlimited10% off regular priced bird and gardening supplies. Not on any special deals or gift cards

Wilson's Lifestyle Centre10% discount on regular priced plants. Not offered on existing instore discounts

Note that to receive the above discounts, you MUST present your SHS membership card at time of purchase.


How to purchase a new membership, or renew an existing one for 2022? Purchase one on our website, or come see us at Gardenscape this weekend! You can also add an annual subscription to The Gardener magazine on to your membership.


Tuesday, March 15, 2022

Join us at Gardenscape!

Step into spring at Prairieland Park from March 25th-27th.  The SHS Gardenscape Committee has been busy planning our booth for this in-person event.  We are going to set up a display to stimulate your senses and include plants and elements with interesting colours, textures, and sounds.     


We are still looking for volunteers for our booth at Gardenscape, especially for Saturday and Sunday.  If you are interested in receiving a free admission pass to Gardenscape in exchange for working one shift at our booth, please fill out the Google Form at this link.

At our booth, we will be selling memberships, cherry pitters, replacement springs and gaskets, and bee nests. The cherry pitters work well with sour cherries and come in two styles, suction and clamp.  The bee nests are for solitary pollen bees and feature different sized holes for different sized bees.  Solitary bees are in decline because of loss of habitat, so pick up a bee nest to take part in saving the bees. (And if you'd like to see the bee nests in action, check out this video from our Cultivating Resilience video series.)

A huge THANK YOU to those who are going to be volunteering at Gardenscape - passes will be mailed the week of March 14.     

Please come by the SHS booth and talk gardening, renew your membership, and see what is happening with the Saskatoon Horticultural Society this year.  Don’t forget to enter your name for one of our door prizes. 

Hope to see you all there!          


Gardenscape hours:

Friday March 25th 11am – 9pm

Saturday March 26th 9am – 7pm

Sunday March 27th 10am – 5pm

Monday, November 15, 2021

Grow Your Own Bean Sprouts!

Written by Robyn Reist, SHS Blog Editor

We've run a couple of excellent posts lately about indoor gardening - Karen Trimble's guide to growing microgreens and Brendalynn Ens's introduction to Aerogardening. If you've been intrigued by these hobbies but just aren't sure if you're ready to commit, may I humbly suggest a gateway activity that costs next to nothing and should give you an idea if going larger-scale on indoor food production is right for you!

Early in the pandemic when public health officials were recommending infrequent grocery shopping trips, I found myself really missing certain types of fresh produce. I love to cook several dishes that require mung bean sprouts but anyone who has ever bought bean sprouts from the grocery store will know that they are instant compost fodder within hours of opening the bag! Love bean sprouts but hate the waste, because my household of two cannot eat an entire bag in one sitting.

I decided to try growing them myself and found out that mung bean sprouts are perhaps the easiest indoor food production project out there!

All you need is:

  • Dry mung beans (you can try with regular store bought mung beans, available at Asian groceries or sometimes in the international foods aisle, but I prefer to use sprouting beans from Mumm's to ensure they will be high quality for sprouting)
  • A mason jar
  • Colander or mesh strainer

That's it! No special sprouting lids or trays required.

To grow your bean sprouts:

  1. Put a tbsp or two of dry beans into the mason jar.
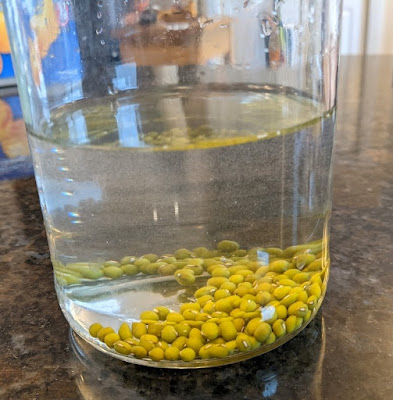
  2. Cover with a few inches of water and soak for at least 4 hours. Up to 24 is fine - you want them to be fully hydrated and plumped up (I usually remember to start them in the afternoon and let them soak until the following morning).
  3. Drain the beans and put them back into the jar. Put the jar in a dark cupboard (this is very important - if you expose them to light they will be bitter and terrible. Ignore all gardening instincts to give growing plants sun!).
  4. Rinse and drain the beans at least twice a day. Four to five times is optimal. If you see the tail end of the sprout drying up or browning, you need to rinse them more often.
  5. When they have sprouted to your liking, rinse one more time and enjoy! This will take between 3-5 days, depending on the temperature of your cupboard and your personal preference. When some of the beans start turning a bit purple and growing leaves, they are ready.
  6. Optional - I am not a fan of the dark green husks so I usually spend some time removing them. Depending how many beans you have sprouted this can become somewhat time consuming, but I find it kind of meditative. Put all of the beans in a bowl with water - most of the husks will float to the top and can be pulled out easily, however about 1/4 of them will still be stuck to their beans so will need to be removed by hand. (If you can't be bothered with this, it is not a big deal to eat the husks; they are a good source of fibre and have no taste.)

Note: If you grow bean sprouts in a jar, they are unlikely to have long straight shoots like the kind you get from the grocery store. I have read that the best way to get them looking like grocery store sprouts is to grow them in a tray with something weighting down the beans as they grow. One time I overfilled a jar so the beans were quite packed in by the time they were ready and all of the additional pressure created longer, straighter sprouts on the beans. Whatever you can do to limit the amount of space they have to grow will give you longer and straighter sprouts. 

Other types of sprouting seeds will grow with a similar method, but for really tiny seeds like alfalfa you may want to either invest in a special sprouting lid or at very least use cheesecloth for straining after rinsing. The Mumm's website has a huge selection of seeds to choose from along with detailed instructions for how to successfully grow them. 

Store your dry beans/sprouting seeds in the freezer when you are not using them to prolong their life!

Do you have a favourite sprout to grow? Let us know!

Monday, November 1, 2021

The AeroGarden™: Tips for Success Using the Latest Winter Gardening Trend

This article by Brendalynn Ens was originally published in the SHS March 2020 newsletter. Brendalynn is a Master Gardener and member of the SHS Water Gardening Sub-Committee.

Last year, a newer trend in hobby hydroponic gardening really expanded.  AeroGrow International Inc. (the company who manufactures and distributes the AeroGarden™ gardening system kits) reported 224% increase in sales for its last two consecutive financial quarters. This increased interest may be due in part to so many of us at home more during the pandemic. For some of us, it’s a way to continue our water-gardening passion and also an easy mechanism to grow our own salad greens, tomatoes and herbs in the dead of winter! 

AeroGarden™ is a self-contained, in-home “kit” for hydroponic seed growing.  In essence, it's a water and liquid fertilizer mini hydroponic system with its own grow-light system.  The kits are available nearly everywhere and range in price from $120-$250 CDN depending on the size or sale.   Pre-sown pods can be purchased along with general supplies to grown your own seeds.  The system runs on an small internal pump.  How much does it cost to run? 

The standard 6-pod “kit” looks like this (see Figure 1).  Smaller and larger pod kits are also available.

Figure 1

I started my first kit in early fall and quickly got caught up in harvesting fresh herbs and lettuce.  By December 2020 I had purchased a 2nd unit and now they are both still in full operation. Despite the simplicity I appreciate the science and instructions that allow this kit to deliver fresh produce. I joined a Facebook AeroGarden Community group with nearly 20,000 users and found it to be a very valuable forum to trouble-shoot issues and receive support.  Many Facebook group members have 5+ units going year-round and have done so for years (Canada, USA, Australia, New Zealand) so in comparison I am very much a neophyte and only beginning my journey.  

In case you are thinking about getting an AeroGarden or already on your way, I’ve compiled my Top 6 list of things that may be helpful.  Remember, I am no expert here, but I’m learning fast and it’s a great cold-weather distraction.

Top 6 Learnings – AeroGarden™

1.  Really read and follow all instructions.   The instructions are incredibly easy but don’t skip reading them carefully.  Pay particular attention to the precise measurement of liquid fertilizer (4-3-6) and keep ongoing notes to avoid missing top-up fertilizing over time.  Too much fertilizer can result in a hyper-rich nutrient environment and balance that quickly results in algae growth and mucky water. This hasn’t happened to me (so far!) but I’ve heard of others experiencing a green algae bloom mess in their system that required extensive cleaning and a full restart. 

2.  Check water levels weekly and don’t rely on automatic notifications.  Certain plants you may be growing (i.e. lettuce) can result in much more water being used more quickly than what the system automatically advises. Keep an eye on the clarity of the water also – if its getting murky, consider changing it. 

3.  The type of water makes a difference.  While the kit’s instructions recommend a 50/50 mix of distilled and tap water, I use Saskatoon tap water with no issues.  Online experts confirm that hard high-mineral and well water is never recommended and can result in calcium build-up in the internal pump system. 

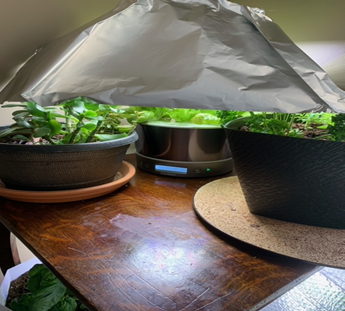
4.  Synchronize the light timer to be off at night.  Unless you want your AeroGarden fully illuminating your entire kitchen or living room in the dead of night, it is best to set your AeroGarden system to be on with daylight hours.  Most kit lights are programmed to provide 10-12+ hours of growing support to plants.  To avoid having your AeroGarden become a “night-light” in your house, find a suitably sized lampshade or create a folded tinfoil “tent” to reflect the light back onto the plants when it is on.  Figure 2 shows my set-up that benefits other plants nearby as well. 

Figure 2

5.  Use or prune your plants AND their root growth.  The excitement of seeing your vegetables emerge from the pods and mature can be thrilling but similar to how lettuce can ‘bolt’ in the summer heat, the same can happen with this system. Overgrown plants may create unnecessary shade for other plants due to their proximity in the grow system.  Don’t let lanky and unattended plant leaves and stems endlessly grow.  This can happen fast! Pruning and/or use of your herbs and vegetables is no different than in our regular summer gardens. Here’s a video that may help hydroponic plant pruning. Don’t forget the root system also!  Healthy and rapidly growing plants  will have highly developed root systems with risk to get caught in the internal pump system. Figure 3 is a Thyme plant which I cut 1” off the bottom to ensure the roots don’t interfere with the circulation of the water pump system.  Here is more guidance on how to do that. Another option, of course, is to transplant your healthy hydroponic plants to other containers allowing you to start new ones! 

Figure 3

6.  Yes you can transplant the plants into other vessels or devices.  Many experts advocate for using the Kratky method to keep plants long-term. The Kratky method is a next-step hydroponic method that does not involve running or circulating water. If Kratky isn’t your thing, the pods can be also successfully transplanted to soil or soil-less medium. 


In conclusion, I’ve found the AeroGarden™ system to be an easy and successful new trend.  It’s not quite the same as summer water gardening but it has been a welcome distraction from the cold winter days and the stay-at-home orders.


Friday, October 15, 2021

Growing Microgreens

 This article by Karen Trimble originally appeared in the SHS March 2020 newsletter.


Microgreens have been growing in popularity, springing up in dishes at restaurants and on foodie social media posts.  With this growth in popularity, they are available at some local businesses in Saskatoon.  These bite-size greens are tasty, nutrient dense, and are a colourful addition to almost any meal.     

What are Microgreens?

Microgreens are seedlings of vegetables or herbs (sometimes grains, fruit, or flowers) that are harvested when their first set of true leaves appear (after the cotyledons) and when the plants are between two to three inches tall. 

The most common microgreens are fast-growing and harvested within 7-14 days of initial seeding.  Some of these include alfalfa, arugula, borage, broccoli, cabbage, clover, corn, cress, kale, kohlrabi, mustard, pak choy, peas, radish, tatsoi, and wheat grass.   Slower growing microgreens (harvested in 15-30 days) include: amaranth, anise, basil, beet, carrot, cilantro, dill, fennel, parsley, swiss chard, salad mixes, shiso, and sorrel.

Growing Microgreens at Home

Supplies Needed:

  • Trays with drainage holes
  • Soilless growing medium (potting soil)
  • Grow Lights are essential if growing year-round in Saskatchewan.
  • Seeds
  • Oscillating Fan (recommended)

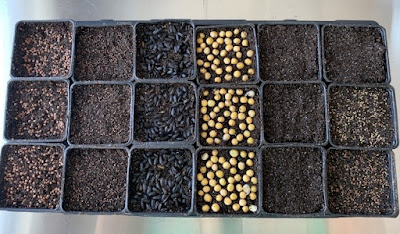
In my setup I like to use one 1020 tray with holes inside another 1020 tray without holes (allows for bottom watering).  Because I like to grow several varieties a once I have 18 – 8cm (3”) black plastic pots that fit inside these trays.  However, any plastic container that is 1” tall and has drainage holes in the bottom to prevent waterlogging the roots can work.    


There are a variety of growing mediums you can use to grow microgreens including: a soilless medium, coconut coir, or even hydroponics.  My preferred growing method is using a sterile soilless growing medium like Sungrow Sunshine Mix.  It is light and airy which provides good aeration for the roots, but still retains moisture.  Because you are harvesting microgreens at such an early stage of development, rarely will you need to use any fertilizer.

Light Requirements – Microgreens require 15-16 hours of light per day.  Natural light from a south facing window will not be adequate most of the year.  There are several options for artificial light sources, the most common being fluorescent and LED grow lights.  There is a lot of information online about the best grow lights for microgreens and this could be an entire article!   In short, if you are in the market for new lights, I would recommend most T5 LED grow lights.

Steps to Growing:

1. Some seeds germinate better if they are soaked first.  These include beets (8-12 hours), peas (12-24 hours), sunflowers (4-8 hours), swiss chard (12-24 hours).

2. Fill pots to the top with moist but not wet soilless mix.  Firmly press down and add more mix until it is 1/4'’ (6mm) from the top.  It is important to have it close to the top so you can easily harvest your microgreens when they are ready.

3. Sprinkle seeds on top of the mix.  Microgreens require dense seeding, there should only be a small space around each seed.  Some larger seeds such as sunflowers touch but should not be on top of each other.  Press seeds down into the soil but do not cover.  Spray seeds with a water bottle one or twice a day to keep moist.     

Microgreen Seeding, Growing, and Harvest Information

Variety

Seeding Rate for an entire 1020 tray

Seeding Rate for 8cm (3”) pot

Germination

Time

Weighted /

Blackout

Harvest

Alfalfa

30 g

1.15 g

1-2 Days

3-4 Days

8-12 Days

Arugula

20 g

1 g

1-2 Days

4 Days

10 Days

Basil (Red)

20 g

1 g

3-5 Days

None, needs light to germinate

20-30 Days

Beets

40 g

2 g

3-4 Days

5-6 Days

10-16 Days

Broccoli

30 g

1 g

1-2 Days

2-3 Days

10-14 Days

Clover

30 g

1 g

1-2 Days

3-5 Days

7-12 Days

Mustard

30-36 g

2 g

1 Day

2-3 Days

7-12 Days

Peas (Yellow)

200-300 g

9 g

2-3 Days

3-5 Days

9-12 Days

Radish

40-60 g

3 g

2-3 Days

2-5 Days

6-11 Days

Sunflower (Black Oil)

100-150 g

6.75 g

2-3 Days

3-4 Days

9-12 Days

Swiss Chard

60 g

3 g

2-5 Days

4-7 Days

8-16 Days


4. Weighted blackout – Most microgreens need to have a weighted blackout period.  This allows the germinating seeds to have good contact with the soil so the roots can firmly become established.  To accomplish this, you can put another 1020 tray on top of your seeds, and then put a weight (approx. 3-5 lbs) on top of this.  Once the seeds have germinated and are pushing on the tray you can remove the weight, flip the tray over (so it’s upside down) and keep the seedlings in blackout until they are about 1” tall.  Taking the weight off will allow the microgreen stems to straighten out and the additional darkness will make the microgreens stretch taller.


Weighted blackout

Blackout

5. Check on microgreens twice daily.  Make sure to keep the soil moist but not saturated.  Bottom water as needed; bottom watering also ensures that your seeds will not get displaced. 


6. Once plants reach 1” tall they will look similar to the arugula below and they are now ready to go under your grow lights.   Grow lights should be adjusted to be 8-12” above the plants.

Arugula ready for the lights

7. To prevent mold or dampening off of seedlings, adequate airflow around plants is essential.  Several times a day I would recommend turning on an oscillating fan on its lowest setting from a distance to provide gently moving air.    

8. Harvesting!  You can harvest your microgreens when they are between 2-3 inches tall by simply cutting them above the soil line with a pair of scissors.  You cut them as you need them and let them continue to grow, or you can cut the entire tray and keep in the fridge for up to a week.  Most microgreens are done producing once you cut them, but wheatgrass can be cut up to three times before they start getting woody.  Also, peas can be harvested twice before they start getting bitter. 

Black oil sunflower

Swiss chard and beets

 Common Problems

  • Root Hairs – this is not in fact a problem but many people who are first time microgreen growers mistakenly think the root hairs growing on their seedlings are mold.  Root hairs are white and fuzzy and very noticeable on some microgreens like radish.  If you are uncertain if it is mold vs. root hairs you can lightly water the stems from above, if the white fuzzy look disappears it is root hairs.    
  • Mold – mold appears more like a stretched-out cotton ball or white spider web; it has long threads.  Prevention is the best strategy: make sure growing media is sterile, wash all pots and trays between use, try not to have your seeds too densely packed, do not overwater the plants, make sure trays have drainage holes, and have moving air around your plants. 
    • There are some seeds like sunflowers that should be sanitized prior to planting to prevent surface mold. To sanitize seed: use a 3% food grade hydrogen peroxide solution.  Use 5mL for every 25g of seed.  Before pre-soaking the seeds pour the peroxide solution right on the seed and stir.  Let soak for 5-10 minutes then pour room temperature water over seeds until they are covered an inch or so. Continue pre-soaking seed for 4-8 hours   
  • Dehulling – beet and swiss chard microgreens are beautiful and colourful but they have pesky seed husks (or hulls).  The hulls tend to stay on the leaves of the greens.  To minimize this, you can cover the seed with more dirt.  The extra layer of soil it must go through will loosen the seed hull.  You may still have to pick off a few hulls at harvest time but not as many.   
  • Poor germination of seeds is usually caused by seeds being too close together or the growing medium being too dry or wet.  Ideal temperature for germinating seeds is between 68-70° F.

Microgreens add an amazing finishing touch to soups, salads, sandwiches, pasta dishes, and even pizza.  They are versatile and an easy to grow.  If you are looking for something new to grow indoors that you can enjoy in a week or two try growing microgreens.  Happy growing!

*Note these are general growing guidelines that I have had success with.  You can find many different resources online with varying seeding rates, weighted blackout times, different light recommendation, etc.